Tuesday, December 14, 2010

Mail Server Install

http://workaround.org/articles/ispmail-etch/
http://www.postfixvirtual.net/postfixantivirus.html#amavisdnew


yum install openssl
yum install openssl-devel
yum groupinstall 'Development Tools'
yum install ncurses-devel
yum install ncurses

DOVECOT


mkdir /usr/local/dovecot-1.1.7
ln -s dovecot-1.1.7 dovecot/a
configure --prefix=/usr/local/dovecot --with-mysql

if the configure bombs with message stating libmysqlclient not found,
then install mysql and set the ldflags to the mysql libraries:

LDFLAGS='-L/usr/lib64/mysql -L/usr/local/mysql/lib/mysql' \
./configure --prefix=/usr/local/dovecot --with-mysql

follow guide http://workaround.org/articles/ispmail-etch/
copy over the mysql files
edit postfix/main.cf

create /etc/postfix/ssl
http://www.projektfarm.com/en/support/howto/postfix_smtp_auth_tls.html


Edit /usr/local/dovecot/etc/dovecot.conf and /usr/local/dovecot/etc/dovecot-sql.conf.

dovecot-sql.conf contents:
driver = mysql
connect = host=127.0.0.1 dbname=mailserver user=mailuser password=mailuser2008
default_pass_scheme = PLAIN-MD5
password_query = SELECT email as user, password FROM view_users WHERE email='%u';


cmusieve

./configure --with-dovecot=../dovecot-1.1.7 --prefix=/usr/local/dovecot/plugin/cmusieve


mysql


mkdir /usr/local/mysql-5.1.30
cd /usr/local

ln -s mysql-5.1.30 mysql

groupadd mysql
useradd -g mysql mysql

./configure --prefix=/usr/local/mysql --with-plugins=innobase
make
make install

mkdir /usr/local/mysql/data
cp a my.cnf to /etc/my.cnf, modify
set basedir=/usr/local/mysql
set datadir=/usr/local/mysql/data

chown -R mysql:mysql /usr/local/mysql
cd /usr/local/mysql
bin/mysql_install_db --user=mysql --datadir=/usr/local/mysql/data
chown -R root .
chown -R mysql data
bin/mysqld_safe --user=mysql &

logging with bin/mysql
add to .bashrc export PATH=${PATH}:/usr/local/mysql/bin
cp support-files/mysql.server /etc/init.d
chkconfig --add /etc/init.d/mysql.server


POSTFIX

yum install db4-devel

--Build Src
p122: make -f Makefile.init makefiles 'CCARGS=-DUSE_SASL_AUTH -DDEF_SERVER_SASL_TYPE=\"dovecot\" -DUSE_TLS -I/usr/include/openssl -DHAS_MYSQL -I/usr/include/mysql' 'AUXLIBS=-L/usr/lib64/mysql -lmysqlclient -lz -lm -L/usr/lib64 -lssl -lcrypto'


--ops1:
make -f Makefile.init makefiles 'CCARGS=-DUSE_SASL_AUTH -DDEF_SERVER_SASL_TYPE=\"dovecot\" -DUSE_TLS -I/usr/include/openssl -DHAS_MYSQL -I/usr/local/mysql/include/mysql' 'AUXLIBS=-L/usr/local/mysql/lib/mysql -lmysqlclient -lz -lm -L/usr/lib64 -lssl -lcrypto'

# mv /usr/sbin/sendmail /usr/sbin/sendmail.OFF
# mv /usr/bin/newaliases /usr/bin/newaliases.OFF
# mv /usr/bin/mailq /usr/bin/mailq.OFF
# chmod 755 /usr/sbin/sendmail.OFF /usr/bin/newaliases.OFF \
/usr/bin/mailq.OFF

postfix:x:1000:1000:Postfix User:/no/where:/sbin/nologin

postfix:x:1000:
postdrop:x:1001:

make
ldconfig /usr/local/mysql/lib/mysql
make install


AMAVIS
http://www.postfixvirtual.net/postfixantivirus.html#amavisdnew
Stored copy

yum install CPAN
yum install perl-Archive-Tar perl-Archive-Zip
yum install perl-Convert-UUlib
yum install perl-MIME-tools
yum install perl-Net-Server
yum install perl-IO-Socket-SSL
yum install perl-IO-stringy
yum install perl-MailTools
yum install perl-Unix-Syslog
yum install perl-BerkeleyDB
yum install perl-DBD-MySQL perl-DBI
yum install perl-Convert-TNEF
yum install perl-Crypt-OpenSSL-RSA
yum install perl-Crypt-OpenSSL-Random
yum install perl-Mail-DKIM
yum install spamassassin

---Start
/etc/init.d/amavis start

--Send spam
sendmail email@email.email < /usr/share/doc/spamassassin-3.2.5/sample-nonspam.txt sendmail dude@email.email 


SpamAssassin

yum install spamassissin

BashRC

Add the the /root/.bashrc file:

export PATH=${PATH}:/usr/local/mysql/bin
export LD_LIBRARY_PATH=${LD_LIBRARY_PATH}:/usr/lib64/mysql:/usr/local/apr/lib
export JAVA_HOME=/usr/local/java
ulimit -n 10000


Insert New users

# mysql -p (xedysp#qts)
# use mailserver
# insert into virtual_users (domain_id,user,password) values (1,'virusalert',MD5('xxxxxx'));
# insert into virtual_aliases (domain_id,source,destination) values (1,'virusalert','t@example.com');


COMPILE CLAMAV
#cd /usr/local/src
#groupadd clamav
#useradd -g clamav -s /bin/false -c "Clam Antivirus" clamav
#tar -zxf clamav-0.88.2.tar.gz
#cd clamav-0.88.2
#./configure --sysconfdir=/etc
#make
#make install
#mkdir /var/lib/clamav
#chown clamav:clamav /var/lib/clamav

Clamav is installedl Lets make a test to see how clamav is working. We are doing our test under /usr/local/clamav-88.2 directory which
contains sample virus-like files. This test will write the output into scan.txt file.
#/usr/local/bin/clamscan -r -l scan.txt /usr/local/clamav-0.88.2
Edit /etc/clamav.conf and modify variables like below; Don't forget to put "#" in front of "Example" text.
#Example
LogFile /tmp/clamd.log
DatabaseDirectory /var/lib/clamav
User amavis
UPDATING CLAMAV VIRUS DATABASE
Every second a new virus/worm is created, we must update our virus database. Freshclam program does this for us.
Before running freshclam edit /etc/freshclam.conf file and modify the line "Example" like below. (Put # in front of it)
#Example
No create necessary log file and run freshclam;
#touch /var/log/clam-update.log
#chmod 600 /var/log/clam-update.log
#chown amavis /var/log/clam-update.log
#/usr/local/bin/freshclam --datadir=/var/lib/clamav -l /var/log/clam-update.log
CLAMAV IN CRONTAB
Create a crontab entry so that clamav will update its database everyday at 08:00 regularly. Put these lines into
your crontab
06 08 * * * /usr/local/bin/freshclam --quiet -l /var/log/clam-update.log

02,03,04 etc. minutes instead of 10 multiples (00,10,20)

RUN CLAMD
#/usr/local/sbin/clamd

Wednesday, December 8, 2010

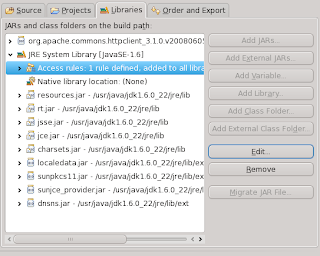
Eclipse and Restrict Access to rt.jar

Edit project properties.
Under the "Libraries Tab" select the "JRE System Libary" > to expand.


Then click to select the "Acces rules:" item and click the "Edit" button.


Add a rule, by selecting the "Add Button"


Enter the rule pattern.  For example, I am trying to use sun.misc.BASE64Encoder.  Therefore, I add the rule pattern "sun/misc/**"


The Eclipse Editor should no long complain about accessing the sun.misc.BASE64Encoder.

Monday, November 29, 2010

Fedora 13 setup

yum update
reboot
yum install httpd
yum install createrepo rpm-devel rpmdevtools expat-devel zlib-devel
reboot

rpm -Uvh http://download1.rpmfusion.org/free/fedora/rpmfusion-free-release-stable.noarch.rpm http://download1.rpmfusion.org/nonfree/fedora/rpmfusion-nonfree-release-stable.noarch.rpm

mv /boot/initramfs-$(uname -r).img /boot/initramfs-$(uname -r)-nouveau.img
dracut /boot/initramfs-$(uname -r).img $(uname -r)

vi /etc/grub.conf
Add to end of Kernel line:
rdblacklist=nouveau nomodeset nouveau.modeset=0

Make sure kernel mod is allowed to load.
setsebool -P allow_execstack on

yum install kmod-nvidia xorg-x11-drv-nvidia-libs.x86_64
reboot

nvidia-settings
reboot

Install Firefox
rpm -Uvh http://rpms.famillecollet.com/remi-release-13.rpm
yum --enablerepo=remi list firefox
yum --enablerepo=remi install firefox


Download Adobe 64-bit flash player from adobe home page.
Untar downloaded file.
Install libflashPlayer.so in ~tmurray/.mozilla/plugins directory.

Install skype
yum -y install libXv.i686 libXScrnSaver.i686 qt.i686 qt-x11.i686 pulseaudio-libs.i686 pulseaudio-libs-glib2.i686 alsa-plugins-pulseaudio.i686

wget http://download.skype.com/linux/skype-2.1.0.81-fc10.i586.rpm

rpm -ivh skype-2.1.0.81-fc10.i586.rpm


Install Virtualbox

http://www.if-not-true-then-false.com/2010/install-virtualbox-with-yum-on-fedora-centos-red-hat-rhel/

cd /etc/yum.repos.d/
wget http://download.virtualbox.org/virtualbox/rpm/fedora/virtualbox.repo
yum install gcc kernel-devel kernel-headers

vi /root/.bashrc
KERN_DIR=/usr/src/kernels/`uname -r`
export KERN_DIR

yum install VirtualBox-3.2

yum install thunderbird
yum install thunderbird-lightning
 yum install mysql-workbench

Download/install latest jre and jdk java rpms

Tuesday, November 23, 2010

Create Local Fedora 13 Repository

The following outlines the necessary steps to create a local Fedora 13 repository.  I used the following guide http://www.howtoforge.com/automatic-and-up-to-date-fedora-9-installations-with-kickstart-and-novi, which generated a Fedora 9 repository.

In order to serve the local yum repository, http needs to be running and installed.

# yum install httpd
# chkconfig --levels 235 httpd on
# /etc/init.d/httpd start


Next we install the tool createrepo:


# yum install createrepo rpm-devel rpmdevtools expat-devel zlib-devel

The default document root for Apache on Fedora is /var/www/html.
Create directories in the apache root to store the fedora base, updates and patched repo's:


# mkdir -p /var/www/html/fedora/base/13/x86_64
# mkdir -p /var/www/html/fedora/updates/13/x86_64
# mkdir -p /var/www/html/fedora/prepatched/13/x86_64

Assuming you have downloaded the fedora13 .iso image, mount it and copy the dvd contents to the Fedora base directory.

# mount -r -t iso9660 -o loop Fedora-13-x86_64-DVD.iso /media/
# cd /media/
# cp -vfr * /var/www/html/fedora/base/13/x86_64

Get the Fedora 13 updates and store in the updates directory under the web server root.

#  rsync -avrt mirrors.servercentral.net::fedora/updates/13/x86_64/ --exclude=debug/ /var/www/html/fedora/updates/13/x86_64/


Download the Novi source code and compile.  http://downloads.exmachinatech.net/novi/2.1.1/novi-2.1.1-1.fc13.src.rpm

Install the source rpm

# rpm -i novi-2.1.1-1.fc13.src.rpm


This will install the source .spec file in the ~/rpmbuild/SPECS directory.

# rpmbuild --bb ~/rpmbuild/SPECS/novi.spec

# rpm -i ~/rpmbuild/RPMS/x86_64/novi-2.1.1-1.fc13.x86_64.rpm


Copy some files from the base directory to the pre-patched directory.

# cd /var/www/html/fedora/base/13/x86_64
# cp GPL ../../13-prepatched/x86_64/
# cp -fr images/ ../../13-prepatched/x86_64/
# cp media.repo ../../13-prepatched/x86_64/
# cp -fr repodata/ ../../13-prepatched/x86_64/
# cp RPM* ../../13-prepatched/x86_64/
# cp TRANS.TBL ../../13-prepatched/x86_64/
# mkdir ../../13-prepatched/x86_64/Packages

Let's apply updates to base into the pre-patched directory.

# novi -a hardlink -t /var/www/html/fedora/prepatched/13/x86_64/Packages /var/www/html/fedora/base/13/x86_64/Packages /var/www/html/fedora/updates/13/x86_64


Create meta data on the pre-patched directory

# cd /var/www/html/fedora/prepatched/13/x86_64/
# createrepo -g repodata/Fedora-13-comps.xml ${PWD}

# crontab -e

23 4 */2 * * rsync -avrt mirrors.servercentral.net::fedora/updates/13/x86_64/ --exclude=debug/ /var/www/html/fedora/updates/13/x86_64 && /usr/bin/novi -a hardlink -t /var/www/html/fedora/prepatched/13/x86_64/Packages /var/www/html/fedora/base/13/x86_64/Packages /var/www/html/fedora/updates/13/x86_64 && cd /var/www/html/fedora/base/13-prepatched/x86_64 && /usr/bin/createrepo -g repodata/Fedora-13-comps.xml ${PWD}

Thursday, November 18, 2010

Create Local YUM Repository

The following outlines steps taken to create a local repository to distribute our own binary RPM's.

I used this http://ramblings.narrabilis.com/wp/creating-a-yum-repository-repo-and-creating-a-yum-group-to-install-kickstart as an example.

# mkdir -p /var/www/html/psydexrepo
# mkdir -p /var/www/html/psydexrepo/os/x86_64


Create groups file (comps.xml)

# vi /var/www/html/psydexrepo/comps.xml

Add the following to the comps.xml file:

<code>
 <!--  <meta> -->
<!-- Meta information will go here eventually -->
<!--  </meta> -->
  <group>
    <id>PsydexSoftware</id>
    <name>pxSoftware</name>
    <default>true</default>
    <description>Default RPMS from Psydex Repo</description>
    <uservisible>true</uservisible>
    <packagelist>
      <packagereq type="default">pxNodeManager-1.0-1</packagereq>
<!--
      <packagereq type="optional">pxNodeManager-1.0-1</packagereq>
-->
    </packagelist>
  </group>
</comps>
</code>

# cd /var/www/html
# createrepo -g comps.xml psydexrepo


Now, if we want to install this group on a machine, we create a .repo file in /etc/yum.repos.d like this:
 

[PsydexRepo]
name=Psydex Repository
baseurl=http://localhost/psydexrepo
gpgcheck=0


# yum groupinstall pxSoftware

Disable SELinux on Fedora 13

To disable SELinux on Fedora 13,

edit /etc/selinux/config.  

Change SELINUX=enforcing to SELINUX=disabled

Building RPM Packages for Java from jar files

I would like to use the rpm packages software in order to distribute and install Java applications on Linux systems.  There are many documents outlining in detail how to generate rpm files.  However, most of the documents I came across, require the source code and make files to generate the binary rpms.  With Java, I am not using the  make and configure utilities to generate the final .jar product. 

The following instructions outline the steps necessary to create a binary RPM file, which can be used to install a Java .jar file on a Linux system.  My build system is using Fedora 13.

First step is to install the RPM Development Tools.  As the root user, issue the command:

# yum install rpmdevtools

Create a user account which will be used to generate the rpm's.
# useradd rpmmanager

Login as the rpmmanager, and issue the command to setup the rpm build tree.
# rpmdev-setuptree

This will create a rpmbuild directory in the rpmmanager's users home directory.  Create a tmp directory in the rpmbuild directory.


# mkdir ~rpmmanager/rpmbuild/tmp

Edit the ~rpmmanager/.rpmmacros file with path information.  My .rpmmacros file contains the following info:

%_topdir      %(echo $HOME)/rpmbuild
%_tmppath      %(echo $HOME)/rpmbuild/tmp


"rpmbuild" needs a ".spec" file to build a ".rpm" file. Create such a spec file in your project directory.

vi ~rpmmanager/rpmbuild/SPECS/pxNodeManager.spec


Example of my spec file.
Summary: Psydex Node Manager
%define version 1.0
License: Psydex
Group: Applications/System
Name: pxNodeManager
Prefix: /usr/local/bin
Provides: pxNodeManager.jar
Release: 1
URL: http://www.psydex.com
Version: %{version}
BuildRoot: %{builddir}/%{name}-root
%description
Psydex Node Manager provides status to the Psydex Service Manager via JMS.

%prep
%build
%install
pwd
rm -rf $RPM_BUILD_ROOT
mkdir -p $RPM_BUILD_ROOT/usr/local/bin/psydexNodeManager
cd $RPM_BUILD_ROOT/usr/local/bin/psydexNodeManager
cp ~rpmmanager/builds/pxService/dist/pxNodeManager.jar .
%clean
%files
%defattr(-,root,root)
/usr/local/bin/psydexNodeManager/pxNodeManager.jar


The above spec file copies the pxNodeManager.jar file from the location I use to build the .jar.  ("cp ~rpmmanager/builds/pxService/dist/pxNodeManager.jar . ").  One can easily add additional files to the binary rpm, by adding them under the %files section of the spec file.


To create the binary rpm, run the rpmbuild command.
rpmbuild -bb ~rpmmanager/rpmbuild/SPECS/pxNodeManager.spec

The rpmbuild command will generate the binary rpm in the rpmbuild/RPMS/platform_name_here directory.  In my case the directory is rpmbuild/RPMS/x86_64

To install the rpm binary simply issue the command:
# rpm -i binary_rpm_filename_here

Wednesday, November 17, 2010

Fedora 13 / VirtualBox Guest Additions Install

After installing Fedora 13, the following steps are necessary in order to get the VirtualBox Guest Additions Installed.

  1. yum install kernel (updates the current kernel).
  2. yum install kernel-devel kernel-headers dkms gcc gcc-c++
  3. reboot
  4. cd /media/VBOXADD*
  5. sh VBoxLinuxAdditions-amd64.run
  6. reboot